Showing posts with label Healthy Eating. Show all posts

Wednesday, November 21, 2012

Spiced Parsnip and Apple Muffins


Tomorrow is Thanksgiving and this recipe is just in time with cinnamony-spicy goodness for breakfast tomorrow, whilst I begin the cooking of the turkey.

If you've never eaten a parsnip, think carrot with a slightly earthy flavor. The taste of these muffins are similar to carrot cake, but not quite as sweet - which is how I like it.

Here's what to do:

Ingredients~
1 C toasted, cooled, chopped pecans
3 parsnips, peeled and grated (about 2 cups)
1 large apple, peeled cored and grated
2 C all purpose four
1 C sugar
3/4 tsp baking soda
1 1/2 tsp baking powder
1/2 tsp salt
1 tsp ground ginger
1/2 tsp ground nutmeg
1 1/2 tsp ground cinnamon
1/2 C golden raisins
2 large eggs
3/4 C safflower oil
1/2 milk
1 1/2 tsp vanilla

Directions~
1.  Preheat oven to 350. Prepare muffin tins with paper cups (I like to give the papers a quick spray with Pam, but you don't have to do that if you don't want to). Combine apple and parsnips in a large bowl and set aside.

2. In another large bowl, whisk together the flour, sugar, baking soda, baking powder, salt, ginger, nutmeg and cinnamon.  Stir in the pecans and raisins and set aside.

3. In yet another bowl, whisk together the eggs, milk, oil and vanilla until thoroughly mixed.  Gently fold the egg mixture and parsnip mixture into the flour mixture JUST until combined.

4. Using a cookie scoop, divide batter into muffin cups and bake until golden brown and a toothpick comes out clean, about 20 - 25 minutes. Cool on a wire rack.  Enjoy!


Thursday, October 11, 2012

Multi Grain Apple Muffin Tops


It was only about a week ago that the temperature here in SoCal was in the 100's...for a couple of weeks straight.  Everyone was crying "Uncle"!  Then, (in the words of Emeril) BAM! Temps dropped, and today it poured rain, along with thunder and lightening (very unusual for us).

Right about now you're probably thinking, "I thought this was a food blog, not a weather report". However, there is a reason for my weather-blathering. When it gets chilly and/or rains, mama has to bake.

I saw this recipe on a container of Multi Grain Hot Cereal (from Trader Joes - natch!) The name of it is "Country Choice Organic Multi Grain Hot Cereal. (I'm sure you could make this with good old fashioned whole oats if you don't want to search for this particular cereal - just don't use the quick cooking kind!).

Truly delicious!


The recipe looked pretty basic and healthy. I decided to add a fresh apple to the party, and instead of regular milk, I used buttermilk. YUM YUM YUM is the result. Lee ate 2 muffin tops, which would be a total of FOUR MUFFINS.

Now....you may be wondering, "what is a muffin top?". I have a "muffin top" pan, that simply bakes the "top" part of a muffin....that yummy, bake-over, flat part of a muffin that everyone rips off and eats first, when they get a muffin. You know what I'm talking about. However, you can make this recipe in regular muffin tins just as easy.

THIS....is a muffin top pan.

And THESE are muffin tops.


SO....if it's raining where you are and you MUST bake something, try this recipe.

Here's how you do it:

Ingredients~
Topping:
1/3 C uncooked grains or oats
2 TBS brown sugar
1 TBS butter, melted
1/2 tsp ground cinnamon

Muffins:
1 C uncooked grains or oats
1 1/2 C flour
1 tsp baking powder
1/2 tsp baking soda
1/2 tsp ground cinnamon
1 C unsweetened applesauce
1 apple cored, peeled and chopped (small pieces)
1/2 C buttermilk
1/2 C brown sugar
1/4 C vegetable oil
1 egg


Directions~
1. Preheat the oven to 400. Line muffin tins with paper liners, or spray with Pam.

2. Prepare the topping by mixing the grains/oats, brown sugar and cinnamon. Add the melted butter; mix well.

3. Prepare the muffins by mixing the grains/oats, flour, baking powder, baking soda and cinnamon in a large bowl. Mix well. In a separate bowl, mix the applesauce, buttermilk, brown sugar, oil and egg. Mix well. Add the chopped apple to the mixture.

4. Add the dry ingredients to the wet mixture and stir gently until just combined.

5. Use an ice cream scoop for even measuring and bake for 18-20 minutes.

This recipe makes one dozen regular muffins, or 6 muffin tops.

Enjoy!


Wednesday, October 10, 2012

Warm Red Lentils with Vermouth


I got a back of Red Lentils at Trader Joes the other day, and saw a recipe on the bag that was very simple and I thought I'd add my own touch to it by adding some traditional veggies - carrots, celery and onion. I also added some fresh bocconcini and  lemon juice at the end and it was SO delicious. The warmth of the lentils begins to melt the cheese and the vermouth and the lemon add an amazing brightness to the earthy lentils. Delicious!

Here's how to do it:

Ingredients~

2 carrots, peeled and cut into small pieces
2 celery stalks, cut into small pieces
1/2 onion, chopped
salt and pepper to taste
olive oil
1 C red lentils (other lentils will work just fine too)
1 clove garlic, minced
2 TBL vermouth
1 C chicken broth
1/2 C parsley, minced
Bocconcini, quartered
Lemon (for squeezing at the end)

1. In a large skillet, heat about 3-4 TBL olive oil over medium heat. Add the carrot, celery and onion to the pan. Season with salt and pepper to taste. Saute the vegetables until soft, about 8 minutes, stirring often.

2. Add lentils to the pan with the garlic. Saute, stirring, for about 2-3 minutes. Do not burn the garlic!

3. Add the vermouth and stir. Then add the broth, starting with 3/4 C and then the parsley. Stir and reduce to low. Cover and let simmer for 10 - 12 minutes or until liquid is absorbed.
     * How to tell if the lentils need more broth? Try one! If it is still a bit hard inside, add the rest of the broth. But they shouldn't be mushy. It's like pasta - the lentils should be al dente! Firm, not hard....not mushy. Hope that helps!

4. To serve, put a portion in a bowl or plate, and top with 3-4 pieces of bocconcini. Squeeze some lemon, to taste, and a bit more olive oil. Season with salt and pepper.

Enjoy!


Tuesday, September 25, 2012

Easy Vegetable Curry


It's been a while since I've posted, but my goal is to make this blog fun for myself and never a chore. Recently, I've been making simple dishes and this one tasted SO good, I decided to sit myself down and share it with you. Time to get back in the blogging saddle again!

This is a vegetable curry for beginners and also for those who don't like their curry blazing hot with spice. It's easy to ADD heat and if you like it that way, go for it. However, I am an admitted spice wimp.

Here's how to do it:

Ingredients~

1 TBL vegetable oil
2 tsp brown mustard seeds
1 medium yellow onion, diced small
1 C long-grain white rice
coarse salt and pepper
1 TBL red curry paste
1 C unsweetened coconut milk (from a 13.5 oz. can)
1 sweet potato (3/4 lb) cut into 1-inch chunks
1 small cauliflower, cut into florets
1 can (15.5 oz.) chickpeas, rinsed and drained
fresh cilantro for serving

Directions~

1. In a medium saucepan, heat 1 TBL oil over medium-high heat. Add mustard seeds and half the onion. Cook, stirring, until the onion is soft, about 3 minutes. Add rice and stir to combine.  Add 1 1/2 C water, season with salt and pepper and bring to a boil. Cover, reduce to a simmer; cook until water is absorbed and rice is tender, about 15 minutes. Remove from heat and let stand 5 minutes. Fluff with a fork before serving.


2. Meanwhile, in a large Dutch oven or heavy pot, heat 2 tsp oil over medium-high heat. Add remaining onion and cook, stirring often, until soft, about 3 minutes.  Add curry paste and stir until fragrant, about 1 minute. Stir in coconut milk and 1 C water; bring to a boil. Add sweet potato and cauliflower and season with salt and pepper. Reduce heat to medium, cover and simmer until vegetables are tender, about 15 minutes.


3. Stir chickpeas into curry and increase the heat to high. Simmer rapidly until liquid reduces slightly, about 2 minutes. Serve curry over rice with fresh cilantro.

Enjoy!


Wednesday, August 1, 2012

Easy Goat Cheese Ravioli with Parsley Sauce


These ravioli are ridiculously easy to make and perfect for summer cooking. Light and full of flavor, yet without making the pasta! HOW is that POSSIBLE? With wonton wrappers, silly! After all, the Chinese invented pasta. It may not be semolina pasta, but the wrappers work in a pinch.


The ravioli are stuffed with a yummy concoction of goat cheese, and ricotta, and topped with a super easy parsley sauce. On the side, you can make a quick saute of chard with lemon and oil. Honestly....I am craving it as I'm writing this. SO tasty!!!!


Here's how to do it~


Ravioli Ingredients:
3 oz. goat cheese
1/4 C ricotta (I used my home made which is as easy as boiling water and the taste is creamier than anything you'll ever buy in the store - the recipe is here on my blog!)
1 small garlic clove, crushed through a press or FINELY minced
a pinch of freshly ground nutmeg
zest of 1/2 lemon
salt and pepper
wonton wrappers (3 1/2 inch)


Directions:
1. In a small bowl, mash the goat cheese, ricotta, garlic, nutmeg and lemon zest with a fork. Season with salt and pepper (always use kosher and fresh ground)


2. Assemble the ravioli by preparing a baking sheet with parchment paper and then placing 6 wrappers at a time (not rappers.....that's a whole 'nother thing altogether) on the sheet. Spoon about a tsp of the filling in the center of each wrapper.  With your fingertip, dampen the edges of the wrappers with water.  


Fold a corner of each wrapper over to form a triangle; press the edges together to seal, eliminating as much air as possible.  Repeat until the filling is gone (you may have wrappers left over).


(Ravioli may be made ahead of time by covering with plastic wrap and refrigerated for up to one day. Or freeze on the baking sheet for 1 hour, then transfer the beauties into a baggie and freeze for up to one month).


3. Bring a large pot of generously salted water to a boil; reduce to a gentle simmer. Drop ravioli into the water, one by one, stirring them GENTLY to prevent sticking. Cook until al dente, about 5-7 minutes. (Cooking time is the same for frozen ravioli).


4. Using a slotted spoon (I used a fish spatula ....but a slotted spoon would be better) drain each ravioli as much as possible and transfer to serving plate. (The recipe calls to put the ravioli on a paper-towel lined baking sheet to drain, but mine stuck.....so I dont' recommend that!).


By the way, here's what happens to a ravioli when there's too much air inside - it explodes in the water. Icky and worthless.  wah.


5. Drizzle with Parsley sauce and some grated Parmesan and serve immediately!


Ingredients for Parsley Sauce:
2 TBL finely chopped parsley
2 TBL Olive oil 
1 TBL grated Parmesan (always use fresh - NEVER from the can!!)
1 tsp water
salt and pepper


Directions:
Mix all of the above in a bowl.   (Did I say, EASY?!!)


Swiss Chard on the side~


Ingredients:
1 TBL olive oil
1 bunch Swiss Chard (also known as red chard), leaves torn into bite-sized pieces and stems cut into pieces (the stems can be tough so if you dont' like them....don't eat them!)
salt and pepper
2-3 tsp fresh lemon juice


Directions:
1. In a large skillet, heat oil over medium. Add the chard and toss until tender for about 4-6 minutes. If all the chard won't fit at first, just add the rest when the first addition reduces down (it's like Spinach - it cooks way down). Season with salt and pepper. Cook for about 4 minutes more. 


2. Drain and discard any liquid from pan; add the lemon juice and serve immediately.

Enjoy!


Wednesday, July 18, 2012

Summer Lasagna


It's hotter than blazes outside right now (side note: "Hotter than blazes" - an old phrase used back when no one in polite society cursed) and the LAST thing I feel like doing is turning on the oven. However, my desire for lasagna continues in spite of all that. 


If you've read any of my blatherings here at TrebleClefChef, you'd have noticed that I tend to prefer simple recipes (simple pleasures for the simple minded).   *ahem*


To say this recipe is simple is a grand understatement, so listen up oh you "I can't cook" types - YOU CAN DO THIS!  I dare you. I double dog dare you.  oh....you get the point.


Here's how you do it:


Ingredients~


1/2 C ricotta (note: making your own ricotta is as easy as boiling some milk, and the flavor and texture is unmatched! I have the directions here on my blog, but you can buy ricotta if you don't want to go to the trouble)
3 TBL grated Parmesan
3 TBL plus 2 tsp olive oil
coarse salt and ground pepper
8 lasagna noodles, broken in half crosswise
1 clove of garlic, minced
2 pints grape tomatoes, halved
2 zucchini (about 1 pound) thinly sliced
1 TBL torn fresh basil leaves plus more for garnish


Directions~


1. Fill a large pot with water and 1 tsp of salt. Bring to a boil, then lower heat and cover the pot to keep the water ready for the noodles.


2. In a small bowl, combine ricotta, Parmesan and 2 tsp of oil. Season with salt and pepper. 


3. In a large skillet, heat 2 TBL oil over medium-high heat. Add tomatoes, then the garlic. Season with salt and pepper. Cook, stirring occasionally, until broken down, about 3 minutes. Transfer tomatoes to a bowl and cover to keep warm.


Bad picture......good tomatoes.  


4. Put the skillet back on the heat, and add 1 TBL oil and the zucchini. Season with salt and pepper. Cook, stirring occasionally, until tender, about 5 minutes. Transfer to a bowl, stir in basil, cover to keep warm.


5. Turn the water back up to high to resume boiling. Add the broken noodles and cook about 11 minutes, then drain the noodles.


6. To serve: place some tomatoes on the plate. Top with a noodle, a spoonful of ricotta, zucchini and more tomatoes. Repeat layering twice. Top with one more noodle then some tomatoes and garnish with some basil and a bit of grated Parmesan.


Enjoy!


Wednesday, March 28, 2012

Blueberry Oat Bars

Heathy, Fruity, Oaty (I know....there's no such word as Oaty).


Ooooh.....blueberries. LOVE them. I made these bars last night there's only a few left this morning. I'm blaming that on Lee (he has eaten most of them). However, I've done my share of grazing today. 

This recipe is SO easy (I know....I say that all the time....but it's true). 

Here's how to do it:

Ingredients~

1 1/2 C quick cooking oats
1 C all purpose flour
3/4 C packed brown sugar
3/4 C cold butter, cut into small pieces
1 C frozen blueberries
1/2 C blueberry preserves - I like Bonne Maman brand (you can substitute with raspberry or strawberry)
1 tsp finely grated lemon zest

1. Preheat oven to 350.

2. Line a 8X8 pan with foil, set aside.

3. In a bowl, combine oats, flour and brown sugar. Cut in the butter with your hands or pastry blender (I just use my hands - it's easier) until the butter is the size of small peas.  Reserve 1 C of mixture to use for the topping.


4. Press remaining mixture into the bottom of prepared pan and bake for 20 minutes.


5. Combine frozen blueberries, preserves and lemon zest in a bowl. Spread evenly over the crust. Then sprinkle with reserved oat mixture and press lightly into berry mixture. Bake for another 30 minutes.


6. Cool completely in pan, on a rack. Cut into bars. 


Enjoy!


Friday, September 30, 2011

Homemade Tarragon and Garlic Vinegar

I have been making this vinegar recipe for years and I love love love it. It makes an incredibly flavorful vinaigrette. I have given this away as Christmas gifts and it makes a great hostess gift too.

If you can boil water and peel a clove of garlic, you can make this. Honest. The only thing that is challenging about this, is getting the garlic and tarragon out of the bottle once it is all gone. I usually fill the bottle with water and shake it into the sink, which brings some of the garlic out. Then I'll use a bamboo skewer to get the rest of the tarragon out. BUT....I only have to do this a couple of times a year! That's how long this vinegar will last you.

The vinegar sort of "cooks" the tarragon and takes some of the green away...but it is so tasty.


Ingredients~
1 bottle white wine vinegar
4-5 cloves of garlic, peeled, cut in half so they pieces can fit into bottle
6-7 whole tarragon stalks
1 Bottle or jar 

Directions~
1. Pour the vinegar into a small pot and bring ALMOST to a boil over medium-high heat.

2.  Put garlic and tarragon stalks into the new bottle or jar.

3. Using a funnel, pour the very hot vinegar into the bottle or jar over the tarragon and garlic. 

KEEP YOUR FACE AWAY FROM THE HOT VINEGAR - IT WILL TAKE YOUR BREATH AWAY (I learned that the hard way).

Let the vinegar cool, then cork the bottle (or close the lid on the jar).  That's it!  For a vinaigrette, use about 2-3 TBL olive oil with 1 tsp vinegar, salt and pepper. yum.

Monday, September 19, 2011

Quinoa and Kale Crustless Quiche

The title sounds like a tongue twister, but the recipe is a tongue pleaser!  A singer friend of mine, Nina Shortridge, sent a link to me, of a site that had this recipe.  The site features food the way I like to eat it: all natural, whole and TASTY!  I think you can have anything you want to eat in life, if you eat seasonally, and with moderation. 

Here's the link to the site: Click here to go to Food52.

Kale greens are some of the most vitamin packed greens on the planet. Check it out: Click here to see why kale is so good for you. 

Quinoa is an ancient grain that is gaining popularity because of it's wonderful taste and nutritional value. Click here to see why Quinoa is so good for you. It has a yummy "nutty" flavor with a chewy texture.

The only ingredient addition I made was sliced mushrooms.  I also added a bit of shredded cheddar on the top during the last 5 minutes of baking. If you look at the recipe online you'll see that I also made some changes in how to prepare it. For the sake of simplicity (and because it's my blog) I'm going to post how I made it (not how they made it).

Lee LOVED this recipe - he is a huge fan of Kale (as you probably know by my other posts) and he mmmm'd and wow'd his way through the meal.  :-)


Quinoa and Kale Crustless Quiche

Ingredients~

1/2 C quinoa
1 C water
2 TBL olive oil
1 bunch kale, stems removed and cut into ribbons
1 vidalia onion, thinly sliced (a mandoline is perfect for thin slicing)
2 cloves of garlic, minced
1/2 C white cheddar cheese, grated
3 oz. cream cheese, cubed
4 eggs
salt and pepper to taste

Directions~

1. Caramelize the onions: Heat the olive oil in a large pan on medium heat. when the oil is shimmering, add the onions. Cook on medium-low until the onions are very soft and brown. This may take up to 30 minutes. The key is to cook low and slow.

 2.. Preheat oven to 350. Butter a 9" pie dish. Rinse the quinoa (I do this in a fine mesh sieve - I find it is the easiest method).


Rinsing the quinoa...


Combine the quinoa and water in a pan. Bring to a boil on medium high heat and then reduce to a simmer for 20 minutes, or until the water is absorbed into the quinoa. Set aside.


Cooked Quinoa
 

3. Remove the onions from the pan, and place them in a large mixing bowl. Add sliced mushrooms to the pan with a dab of butter. Saute on medium-high heat to get a nice brown sear on the mushrooms. When cooked, remove mushrooms to the bowl with the onions.


Slice the kale into strips by laying the leaves on top of one another and slice away!


4. Add the kale into the hot pan with a swirl of olive oil and a TBl or two of water. Cook onmedium heat until completely wilted and bright green, about 5 minutes. Allow to cool a bit.


Cooked and bright green.

5. Add kale, cooked quinoa, garlic, cream cheese, and cheddar to the mixing bowl. Stir until evenly mixed.


6. In a small bowl, whisk the eggs then pour over quinoa/kale mixture. Stir until egg is completely mixed in. Season with salt and pepper.


Ready for the oven.

7. Pour the mixture into prepared pie dish and bake for about 45 minutes or until top is golden brown. (I also added more cheddar to the top during the last 5 minutes of baking). Let cool for about 5 minutes before cutting.


Out of the oven....ready to slice....


Enjoy!


Saturday, September 17, 2011

Orange Sorbet

I love ice cream. I could eat it every day of my life and never get tired of it's creamy, cold goodness. I really don't care if it's the middle of winter either...I just want to eat ice cream. You could put all kinds of delectable desserts in front of me and I could pass them up easily if there was some ice cream to be had. Growing up, there was always a carton or two of ice cream in the fridge and we usually had some for dessert on most nights and that was probably because my mom hated to cook so there wasn't a lot of baking going on when I was younger.

I found this recipe (if you can even call it that!) in one of my Everyday Food Magazines and showed it to Lee (who loves sorbets just about as much as I love ice cream) and he thought it would be great so I decided to make it tonight. Now, let me say that Lee likes "tart" way more than I do. He will choose a lemony sorbet or some other tart sherbet over ice cream. I, however, always go for the creamy ones and truly love gelato more than any other type of ice cream. 

For this reason, I thought I might not like this recipe as much as Lee would. I was wrong! This turned out very "creamy", but with NO cream!  Anyway, because this goes into the food processor, it becomes a delicious, healthy, "creamy" concoction that you don't have to feel guilty about eating.


Orange Sorbet~

Ingredients:

3 C fresh orange juice
1/2 C sugar

Directions:

1.Squeeze 5-6 oranges to yield 3 C juice (I used Trader Joes Orange Juice because it is always delicious and never too tart or acidic). In a small saucepan, combine 1/4 C of the juice and 1/2 C sugar. Boil over high heat, stirring until sugar dissolves, about 1 minute.  Transfer mixture to a shallow 2 quart dish, and add remaining orange juice.

2.  Freeze until solid, 2- 2 1/2 hours. With a fork, break into small pieces. Put the broken, frozen juice into a food processor and process until very smooth (you may need to scrape down the frozen juice a couple of times). Transfer to an airtight container; store in freezer. Before serving, let soften in refrigerator for 10 - 15 minutes.

Enjoy!

Thursday, September 15, 2011

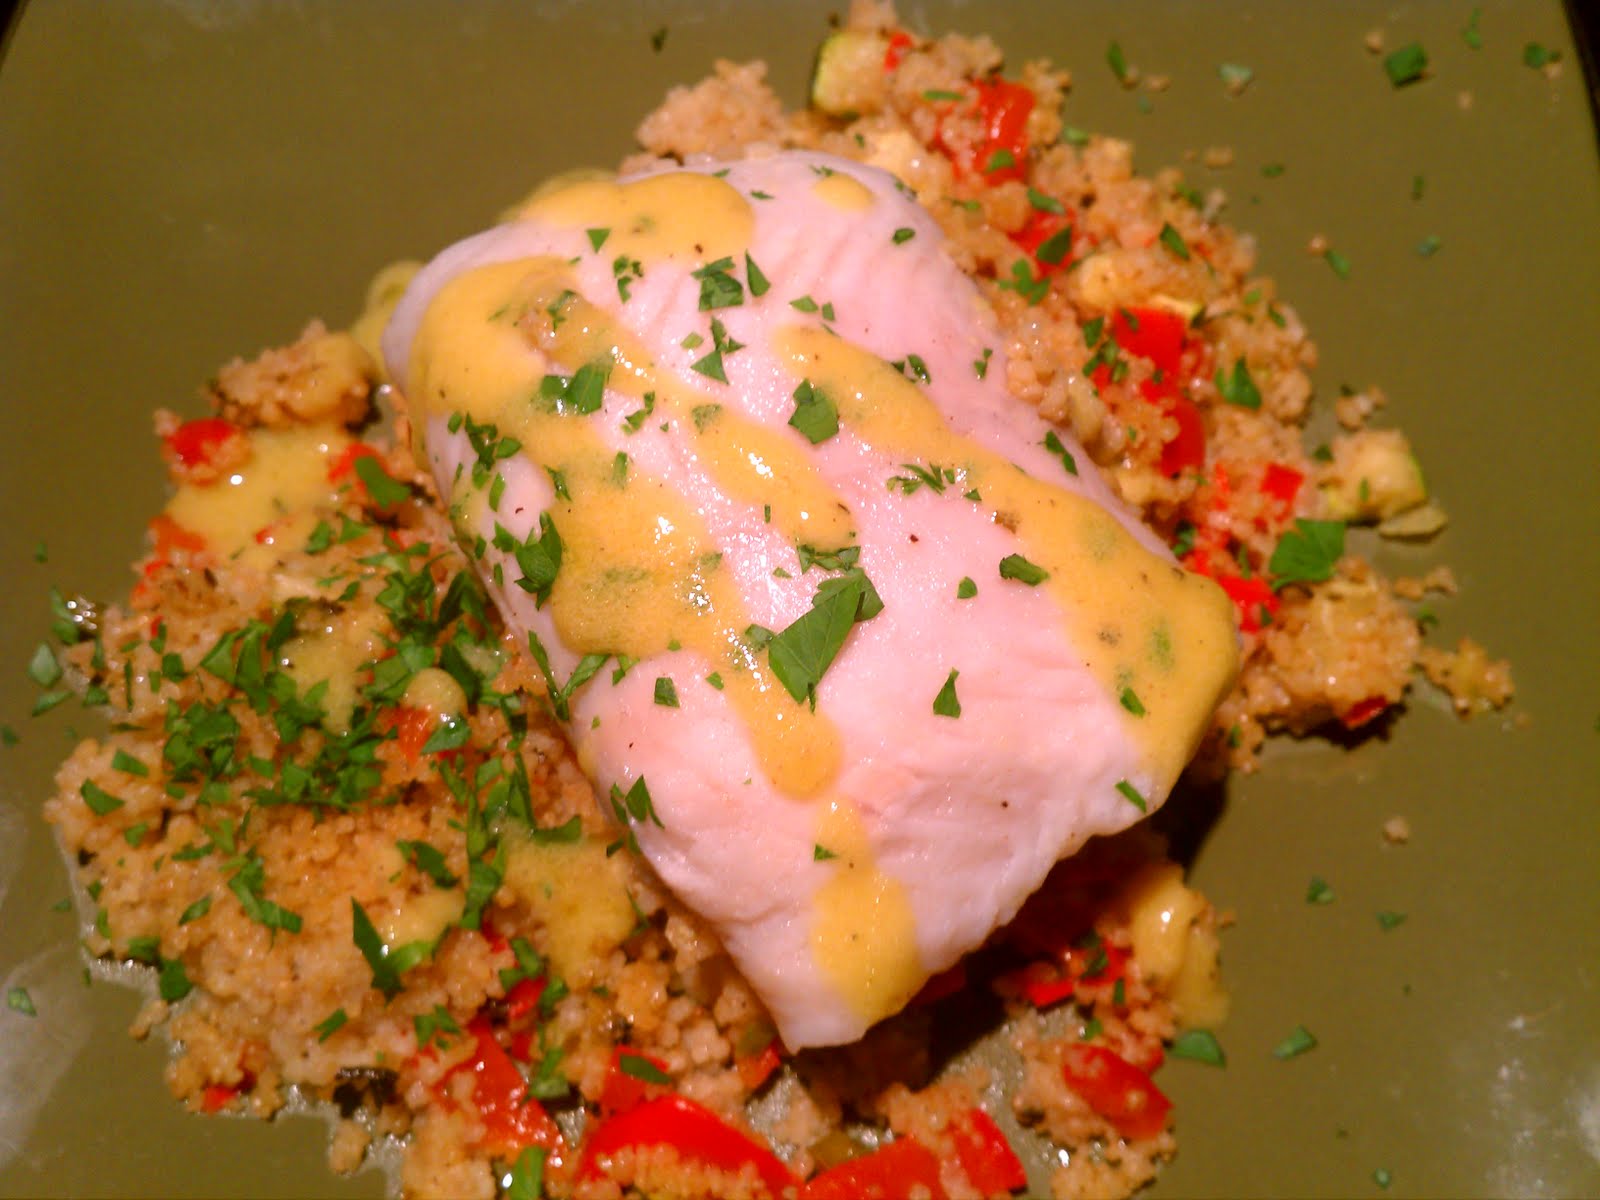
Steamed Flounder with Vegetable Couscous

I wanted to make something light but tasty for Lee and I last night and was so surprised at how much flavor there was for a "light" recipe! I usually end up making some changes or adding my own spices to recipes in some way and this one is no exception. Here are my changes: I used chicken broth instead of water (I know.....chicken broth with a fish recipe sounds suspect, but it added wonderful flavor), and I added 3 chopped green onions to the vegetables.  OH...and instead of using flounder, I used the "White Roughy" from Trader Joes, which comes frozen in the bright orange bag. This frozen fish is the ONLY frozen fish I ever use. It always turns out perfectly and never has a fishy taste.

Once again, this is from Everyday Food Magazine (I love Martha).


Steamed Flounder with Vegetable Couscous

Ingredients~

1 C couscous (I used the whole wheat couscous from Trader Joes)
1 red bell pepper, ribs and seeds removed, finely diced
1 zucchini, finely diced
3 green onions, chopped fine
1/2 tsp dried oregano
3 TBL olive oil
salt and pepper to taste
1 TBL plus 1 tsp Dijon mustard
4 flounder fillets (6-8 ounces ea.)
1 TBL white-wine vinegar

Directions~

1. In a 2 quart, shallow microwave-safe dish, combine couscous, bell pepper, zucchini, green onion, oregano, 1 TBL oil and 1/2 C water (I used chicken broth). Season with salt and pepper. Cover, and microwave on high until vegetables are crisp-tender, about 3 minutes. Stir mixture.

2. Dividing evenly, spread 1TBL Dijon over one side of fish; season with salt and pepper. Roll up each fillet, and place on top of couscous. Cover, and microwave on high until fish is almost cooked through, about 4 minutes. Let stand, covered, 5 minutes to finish cooking. (If the fish is not opaque at this point, as mine wasn't, just put it back in the microwave for 2 more minutes and let rest again).

3. Meanwhile, make a vinaigrette: In a small bowl, whisk remaining teaspoon Dijon, with vinegar and remaining 2 TBL of oil. Season with salt and pepper. Drizzle fish and couscous with vinaigrette, and season with ground pepper and freshly chopped parsley.

enjoy!

Lemon-Cornmeal Cookies

Sometimes, you just gotta have a cookie. That's how I felt the other night, but I didn't want to go into a long and laborious, time consuming cookie making session. Those times are left to Christmas when I want to make special recipes that are a bit more involved and require a bit of attention to detail.

No, I wanted something very quick, easy, healthy and tasty. So I headed to my Everyday Food Magazine collection and found this recipe which filled the bill.  I'm not sure, but I think these cookies have their origin in Italy. (don't quote me on that!).  They are more of a "crunchy" cookie, rather than a soft and chewy cookie. They are great with a cup of tea and have a wonderful, fresh lemon taste.


Lemon-Cornmeal Cookies

Ingredients~

1 1/2 C all-purpose flour
1 C yellow cornmeal
1 TBL finely grated lemon zest (I used the zest of 2 small lemons)
1/2 tsp salt
12 TBL (1 1/2 sticks) unsalted butter, very soft
3/4 C sugar
1 large egg

Directions~

1. Preheat oven to 350. In a small bowl, whisk together four, cornmeal, lemon zest and salt.

2. In a large bowl mix butter, sugar, and egg until combined. Gradually add dry ingredients until moistened.

3. Pinch off and roll dough between hands to form balls, each equal to 1 1/2 TBL (I used a small cookie scoop for uniform size). Place on 2 baking sheets, about 2 inches apart. With fingers or palm of hand, flatten balls to 3/4 inch thickness.


4. Bake until lightly browned around edges, 20-25 minutes; transfer to racks to cool completely.

enjoy!

Sausages with Kale and White Beans

I think you either love kale, or hate it. I think Brussels Sprouts and cabbage have the same defining factor with people. They all draw a line and you are squarely on one side or the other. So for those of you who don't like kale, this recipe is probably not for you. BUT for those of you who do, this recipe is a winner! It is not, however, vegetarian. This one includes delicious, fatty, tummy warming Italian sausages. If you don't want to use those, you could substitute one of the wonderful vegetarian sausages that are on the market now and the result would be just fine. If you want to add more fiber to your diet, this recipe is a great way to do it because both kale and beans are high in fiber and low in fat. yum!

This recipe comes from Everyday Food Magazine (a Martha Stewart mag) and it was very quick and easy. I made a few changes, as I usually do, which I will note here.


Sausages with Kale and White Beans (otherwise known as Cannellini)

Ingredients~

1 large bunch of kale (1 1/4 lbs to 1 1/2 lbs)
4 garlic cloves
1 1/2 lbs sweet Italian sausages (about 8 links)
2 TBL olive oil
salt and pepper
1 can (15 oz) cannellini beans
2 TBL white-wine vinegar

Directions~

1. Remove thick stems from kale, and discard. Chop kale; wash and dry. Peel and thinly slice garlic, combine with kale in a large bowl (or you can do this ahead of time and put the kale and garlic in a plastic baggie).

2. Heat broiler, with racks set 4 inches from heat. With a fork, pierce sausages all over; place on a broilerproof rimmed baking sheet. Broil, turning occasionally, until browned and cooked through, 8-10 minutes.

3. While sausages are cooking, heat oil in a large skillet (I used a large, deep pan) over medium-high heat.  (At this point I added one finely chopped onion, which the recipe does not include). Add kale, garlic, and 1/2 C water, season with salt and pepper to taste. (I used chicken broth instead of water for extra flavor - the broth has salt so season accordingly. I also added my "secret seasoning weapon...1 tsp of smoked paprika!).  Cover and cook, tossing occasionally, until kale is wilted and tender, 10 -12 minutes (I let it cook for about 20). Drain and rinse beans, add to skillet along with vinegar. Cook, uncovered, tossing gently until beans are heated through, about 2 minutes.

4. Serve cut sausages on a bed of the kale and beans. ( I used 5 sweet Italian sausages and 2 Andouille sausages to give it a bit of kick!).

Enjoy!