Thursday, March 31, 2011

Old Fashioned Cucumber and Red Onion Salad

I live in California and last week I was still using the heat in the house. Today it was around 80 degrees. It seems as if California has decided to skip Spring altogether and just head into Summer....which is fine with me!
When the weather heats up, I crave fresh veggies and food from the grill.

I had a few cucumbers and was trying to figure out what to do with them and found an old recipe I wanted to try for Cucumber Salad. I made a few "adjustments" (plain Greek yogurt instead of sour cream, powdered garlic instead of fresh). Don't GASP at me! I love fresh garlic, but I think it is better to use dried in this recipe because it gives a more even flavor without biting into a piece of raw garlic (which sticks with you for a while).

This recipe turned out so well, that I decided to just have this for dinner. It made for a very light and refreshing dinner.  (ok....I had a piece of bread with it too....and a glass of wine).  cheers!


Old Fashioned Cucumber and Red Onion Salad

3-4 Hot House Cucumbers sliced paper thin (if you use regular cucumbers, be sure to skin them first and scoop out the seeds with a spoon....I like the hothouse because you can just slice them up, skin and all!)
1/4 - 1/2 red onion (depending on how much onion you want) sliced paper thin

Dressing:
1 C plain greek yogurt
2 TBL olive oil
1 tsp white wine vinegar
1 tsp salt
1/4 tsp freshly ground black pepper
1/2 tsp sugar
1/4 tsp garlic powder
1 TBL fresh chopped dill (you can also use dried)

Thinly slice cucumbers and onion into a medium bowl. (I use a very inexpensive OXO mandolin).

In a separate bowl, mix together the dressing ingredients, and pour over cucumber and onion slices. Serve immediately.


Thursday, March 24, 2011

French/Italian Baked Tomatoes

Baked Tomatoes (otherwise known as "Tomatoes a la Provencal") are one of life's most delicious things to eat. Well....maybe truffles would beat them out....ok, and caviar. But 3rd place isn't bad!  The traditional recipe does not include the 2 things that make this recipe half Italian - basil and Parmesan cheese.  I guess if you want to get REALLY technical, you'd have to call this recipe "French/Italian/Japanese Baked Tomatoes" but that sounds awful. However, the Panko crumbs I used instead of traditional crumbs make it so wonderfully crunchy.

I had made some "No Knead Bread" (the recipe is posted here!) and wanted something light to go with the bread for dinner. So I made these tomatoes  - perfect! I only used 3 tomatoes tonight, but the topping can easily go for 4.

Here's my recipe for French/Italian Baked Tomatoes~

Preheat oven to 350 degrees.

Halve tomatoes (not stem to stem, but through the middle).
Place in baking dish. Sprinkle with kosher salt and freshly ground pepper.

In a small bowl, mix together:
2 cloves minced garlic
chopped thyme, parsley, and basil to equal 1/4 C
1 C Panko bread crumbs
1/4 C finely grated Parmesan cheese

Place breadcrumb mixture on tomatoes (about 2 TBL each) and then drizzle with olive oil.

Bake, uncovered, for about 40 minutes, or until lightly browned. Serve immediately!


Tomatoes ready for the topping.

Topped and drizzled with some olive oil.


Nicely browned and ready to devour.


No Knead Bread

I know. Who has time to make their own bread anymore. With so many amazing artisan breads available everywhere, the thought of MAKING bread seems quite antiquated. But there's something so incredibly gratifying about making BREAD. It has been the staple of life for thousands of years.

I made bread when I was in my early 20's. Once. That was it. I was not very good at it and had no desire to try it again.

Fast forward 30 years to today. I found this recipe after a friend of mine posted a similar one on a familiar social network that will remain nameless and faceless. He called it "No Knead Bread" which piqued my interest. His recipe was for all white flour which I LOVE but try not to eat because of the carbs. After a bit of research, I found a recipe that called for whole wheat flour, white flour and wheat bran which made me want to try it. It came out of a Martha Stewart Magazine. The magazine recipe includes the whole wheat flour, whereas the online recipe doesn't. SO....I will notate the difference below.

This bread is so easy, it can be made by a kid - which isn't a bad idea! Make this with your kids (just take over when it goes into the screaming hot dutch oven).

This recipe was found on MarthaStewart.com and I want to give full credit where it is due.

Here's the link:
http://www.marthastewart.com/332658/no-knead-bread


The Martha Mag recipe calls for:
2 1/4 C unbleached bread flour
3/4 C whole wheat flour
1 1/4 tsp salt
1/2 tsp  active dry yeast (from one 1/4 oz envelope)
1 1/3 C cool water
wheat bran, cornmeal or flour for dusting

Otherwise, it's exactly the same recipe.


The beginning of bread.


Dusted with wheat bran.


In the pre-heated and blazing hot oven. (pot is pre-heated too!)


Looking like....bread!


It popped right out of the pot - so easy.

Yum.

Monday, March 21, 2011

Linda Griffin's Cocoa Bottom Banana Pecan Bars

That title is a mouthful....but so are these bars (knuck knuck.....). Thank you! I'll be here all night! (rim shot). I guess I'm in a silly mood, but that's the way I feel when I'm around Linda. To know her is to love her. She is an amazing woman. Multi-talented is she. She sings....she acts....she dances....she is a mom...and a wife...AND she is a wonderful cook....not to mention a beloved friend. Linda was in the Tony-Award Winning Production of "The Drowsy Chaperone" on Broadway, not to mention countless other musical theatre productions.
Here's a link to some of her credits:
http://broadwayworld.com/people/Linda_Griffin/

I have decided to dedicate a page on this blog, to my friends in the entertainment industry who want to give me their recipes - and as I've said before, all the recipes I post on TrebleClefChef are recipes I have made and eaten so there are no "unknowns" here.

This recipe is SO delicious and easy to make - great for feeding a bunch of musicians, which is exactly what I did when I made it. I used to bring a baked treat for the guys in "Legends of Swing" when we did gigs at Disneyland. It was something I began doing as a way to get my "baking-jones" outta my system, and also make the boys happy. There is no musician on earth who will turn down free food....especially free food that falls into the "baked goods" category.

Linda gave me this recipe and the boys loved it and I'd love to share it with you. 


Linda Griffins' Cocoa Bottom Banana Pecan Bars

1 C sugar
1 stick butter, room temperature
5 ripe bananas
1 egg
1 tsp vanilla
1 1/2 C all purpose flour
1 tsp baking powder
1 tsp baking soda
1/2 tsp salt
1/2 C chopped pecans (toasted or roasted)
1/4 C unsweetened cocoa
1/2 C semi-sweet chocolate chips

Preheat oven to 350. Grease a 13x9 brownie pan with the wrapper from the softened butter. Beat sugar and butter at medium speed until creamy. Add bananas (don't bother mashing, just break them up and throw them in), egg and vanilla. Beat until well blended. Combine flour, baking powder and soda, salt. Add to banana mixture and beat until blended. Stir in pecans by hand.

Divide batter in half. Stir in cocoa and chocolate chips into one half, then spread this layer on bottom of pan. Top with the plain batter and swirl into cocoa layer. Bake 30-35 minutes. Cool completely on wire rack, cut into bars.


Butter and sugar, creamed.


It's bananas around here! (rim shot)


Flour mixture into wet mixture...


mmmm....toasted pecans....


Half chocolate, half banana...


Banana on top....


Ready for cutting...


Time to get in my belly!!!


Ina and Tyler.

If you're not a "foodie", then you probably don't know who I'm talking about. In the world of music, you have one-namer's like: Cher, Celine, Elton, Barbra, etc. In the world of foodies, you have: Martha, Ina, Emeril and Tyler (Florence). Ok, Tyler may not be famous enough to go by one name but I think he should.

Tonight I decided to combine a couple of Ina's and Tyler's recipes and the result was FAB!  I saw Ina's recipe for Lemon Chicken Breasts the other night and couldn't wait to make them. She suggests making Basmati rice to go with them, which is fine and good, but I was also craving creamy polenta. My brain went straight to Tyler's recipe and I want to tell you about it. Lee is on the road, so I decided to make a 1/2 recipe of both - it worked out perfectly. But I am posting the recipes as given by Ina and Tyler.

Here are Ina's and Tyler's recipes~

Ina Garten's Lemon Chicken Breasts

1/4 C olive oil
3 TBL minced garlic (9 cloves)
1/3 C dry white wine
1 TBL grated lemon zest (2 lemons)
2 TBL freshly squeezed lemon juice
1 1/2 tsp dried oregano
1 tsp minced fresh thyme leaves
kosher salt and freshly ground black pepper
4 boneless chicken breasts, skin ON (6-8 oz each) (I used breasts with the bones (ribs)  - it was just fine)
1 lemon

Preheat the oven to 400 degrees.

Warm the olive oil in a small saucepan over medium-low heat, add the garlic, and cook for just 1 minute but don't allow the garlic to turn brown. Take the mixture off the heat, add the white win, lemon zest, lemon juice, oregano, thyme and 1 tsp salt and then pour into a 9x12 baking dish.

Pat the chicken breasts dry and place them skin side up over the sauce. Drizzle the chicken breasts with olive oil and sprinkle them liberally with salt and pepper. Cut the lemon in 8 wedges and tuck in in among the pieces of chicken.

Bake for 30-40 minutes, depending on the size of the chicken breasts, until the chicken is done and the skin is lightly browned. If the chicken isn't browned enough, put it under the broiler for 2 minutes. Cover the pan tightly with foil and allow to rest for 10 minutes. serve hot with the pan juices.

(NOTE: Ina suggests serving with steamed green beans, which is exactly what I did!)

Tyler's Soft Polenta with Parmesan and Black Pepper

2 qts chicken stock
1 tsp sea salt
2 C polenta or yellow cornmeal
1/3 C heavy cream
2 TBL unsalted butter, at room temperature
1 C freshly grated Parmigiano-Reggiano cheese
1 1/2 tsp freshly ground black pepper

In a large pot, bring the chicken stock and salt (I omitted this salt...I think there's already enough in the stock) to a boil. Gradually whisk in the cornmeal in a slow, steady stream. The liquid will be absorbed and the cornmeal will lock up; don't freak (Tyler's words....!), just whisk through it.

Lower the heat, and continue to whisk until the polenta is thick and smooth, about 20 minutes. (This is where you get great a great arm workout!). Add the cream and butter (there goes the workout!) ; continue to stir until incorporated, about 10 minutes.

Remove from heat, fold in the cheese and black pepper. Serve hot!


Yummy ....


Right outta the oven....


Saturday, March 19, 2011

Mom's Birthday Pie

My mom's birthday is in a few days and in her honor, I'd like to share a recipe she gave me years ago. I remember her making this when I was little (which is interesting because my memories of my mother's cooking were things like Tater Tot Casserole with canned cream of mushroom soup and frozen peas and carrots...not to mention the Pillsbury Pop Tarts and Crescent Rolls). 

I digress.

Usually people make a cake when it's someones birthday, but my mom loves Cheesecake. HOWEVER, not the typical cheesecake in the New York style. She likes the California Cheese Pie. It has a graham cracker crust, and a creamy cheese filling, with a layer of sweetened sour cream on top. It.....is.....divine.  I don't have a picture of one but I will post one the next time I make one of these.  This recipe has also become a favorite of ours at Christmas so I eat this at least once a year. 


Mom's California Cheese Pie


For the crust:
Put 16 (1 individually wrapped package of crackers, inside the large box) graham crackers in a food processor with 2 TBL brown sugar. Pulse until completely crumbly. OR put the crackers in a zip top baggie and crush them with a rolling pin, then put the crumbs in a bowl and add the sugar. Next, add 6 TBL melted butter to the graham cracker mixture. Press the mixture into a pie tin and bake for 5 minutes at 350 degrees.


For the pie:
2 eggs
1 tsp vanilla
1/3 C sugar
8 oz. regular cream cheese (don't use fat free!) room temperature.

For the topping:
1C sour cream
4 TBL sugar

1. With a hand mixer or stand mixer, whip the room temperature cream cheese until smooth and creamy, then add the eggs, vanilla and sugar. Mix until very well combined. 

2. Pour into prepared crust. Bake for 20 minutes at 350 or until firm. If it is very jiggly or looks wet in the center, bake for another 5 minutes or so. Let the pie cool for 5 minutes.

Whip the topping ingredients and gently pour over the top of the pie, covering the filling completely. Bake for another 5 minutes.
Cool completely and refrigerate for several hours before serving.


Get in there butter....


Into the tin with you


Pressing it in..the tin.


Outta the oven...


Ta-dah!


Thursday, March 17, 2011

Irish Soda Bread

Every year on St. Patrick's Day, I love to make soda bread. It is something I prepare myself for, mentally, because I usually eat a rather low carb diet and I usually tell myself I'm not allowed to eat white starchy carbs.  If I have carbs, I do my best to have whole grains.

 BUT.....when it comes to Irish Soda Bread, it has to be the white flour - I just think it's so delicious.....especially slathered with irish butter.  
COME ON!!! I only eat this ONCE A YEAR!!
It has raisins too, which adds a bit of sweetness and is scrumptious with corned beef and cabbage.

Here is the recipe for my once a year, white flour, carb-fest, Irish Soda Bread:

Sift together:
2 C flour
1/2 tsp baking soda
3/4 tsp baking powder
1/2 tsp salt

Add: 1/4 C raisins

Then add:
1 1/2 - 2 C buttermilk (this depends on the moisture in the air - you don't want this to be sloppy wet - the ingredients should be wet enough to come together, but not sticky)

Turn out onto floured board and knead 5-6 times until loaf comes together. Form into a round shape and sprinkle with flour. Bake on a floured cookie sheet at 325 for 20-30 minutes, or until lightly browned.

(TIP: Instead of flouring a board and then transferring to a baking sheet, I use a Silpat mat on a baking sheet. I turn the dough out directly onto a floured silpat, knead a few times and it goes directly into the oven. EASY!)


Slathered in butter....


Perry...

In the late 1980's, I had the amazing opportunity to be a backround singer for Perry Como. I worked with him for several years before he passed on and those were concerts and road trips I'll never forget. He was the same person onstage as he was off. He was calm, unassuming, connected to the audience. He still considered himself a barber and a lucky "crooner". He adored Bing Crosby and the clip I'm including here is from a concert we did with the Boston Pops, John Williams conducting. The great Nick Perito was Perry's personal conductor - I am honored to have worked with him as well.

The girls I worked with were the cream of the crop - and at various points in the show, we had 6 part harmony which was thrilling because everyone sang on pitch! (I'm the one on the far right in the burgundy dress).

I hope you enjoy the beauty and simplicity of Perry's singing. He is a classic and will always live on because of the wonderful recordings we have of his voice.


Red Pepper Roasting

Say that three times, fast. Red Pepper Roasting....Reh Pepper Roasting....Rep pepper posting....
ummm....

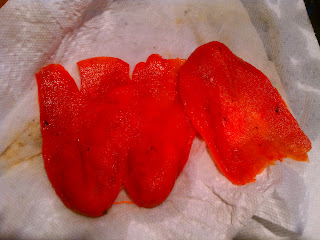
Anyway, I roasted a couple of red peppers the other night and wanted to post the ridiculous simplicity of how I do it. Some people put them on a sheet pan in a 400 degree oven with a drizzle of oil until they are charred. That's ok....but the oven makes the house hot in the summer (at least it does in my house!) and then you have to wash the pan. I hate washing dishes so if I can eliminate doing that, I'm all for it.

My method will not work on an electric stove. If you try my method on an electric stove, and your house burns down, you can refer back to this paragraph where I plainly state you should not do this on an electric stove.

SO....you take that pepper and you put it directly on the fire. I guess to be a bit more specific, you could say that you set the pepper on the grate that sits on the top of your gas stove, but I think you know what I mean. The flame should be on medium high. Rotate the pepper so that it gets completely charred all over. When it's all blackened, take it off the flame and immediately wrap it in a paper towel. Let it steam until it's cool enough to handle, about 10 minutes. Run the pepper under cold water and peel the charred skin off. Then just cut it into thin slices, discarding the stem and seeds.  Add a drizzle of olive oil, a pinch of salt and pepper and a few drops of balsamic vinegar and you are in heaven!


Saturday, March 12, 2011

Eat Your Vegetables! (yes mother).

Why are Americans (in general) getting so fat?  That's an easy one: too much fat, starchy carbs, sugar, not enough exercise, not enough protein and whole grains, and not enough VEGETABLES.  I can just hear people clicking away from this post because most peoples' idea of a vegetable is something that is akin to mush. The vegetables I grew up with were things like broccoli cooked within an inch of it's mushy life, tater tots, head-lettuce (almost devoid of nutrients but I admit I love it) and canned asparagus. There's only one word for canned asparagus - BLLLLLLEEEEECCCCHHHHH.  Ok two words - BLECH and UCK.  I love my mother....more than many of you will ever know, but she is an admitted bad cook which is fine because somehow or another, I managed to discover the amazing world of vegetables on my own.


So, in honor of Spring, which is almost upon us and my mother's birthday which is the first day of Spring, I'd like to share a few of my favorite vegetable recipes for you.


The first is too simple to even be called a recipe but here goes~


Grilled FRESH Asparagus


Heat Grill pan to screaming hot over medium high heat for about 5 minutes.


Break off bottom ends of asparagus where it naturally breaks (take one spear and holding each end, gently bend until it breaks. Then line it up with the rest and cut them all at that point. OR...you can break them all but I don't usually have the patience).


Put them on the grill pan. NO OIL.  Grill, turning, until grill marks appear and spears are cooked, about 8 minutes.
Put spears into dish. Drizzle with olive oil (I use about 2 TBL) and season with S&P and fresh lemon zest and a squeeze of lemon juice.  YUM.


This next recipe is from Ina Garten. Lee and I love this one - very easy. Thank you Ina!


Garlic and Herb Tomatoes


3 TBL Olive Oil
2 minced garlic cloves
2 pints cherry or grape tomatoes
2 TBL chopped fresh basil, plus more for garnish
2 TBL chopped fresh flat-leaf parsley, plus more for garnish
2 TBL chopped fresh thyme leaves
1 tsp kosher salt
1/4 tsp freshly ground black pepper


Heat the olive oil in a saute pan large enough to hold all the tomatoes in one layer. Add the garlic to the oil and cook over medium high heat for 30 seconds. Add the tomatoes, basil parsley, thyme, salt and pepper. Reduce heat to low and cook for 5-7 minutes, tossing occasionally until the tomatoes begin to lose their firm shape. Sprinkle with a little fresh basil and parsley and serve hot or at room temperature.


Here's the link if you'd like to look at Ina's recipe directly:
http://www.foodnetwork.com/recipes/ina-garten/garlic-and-herb-tomatoes-recipe/index.html


 I know this will sound like an Ina-fest, but here's another one of her recipes that I have made countless times. In fact, Lee says that if this were the only way I ever cooked potatoes again, he'd be happy with that. It's SO easy.

Ina's Dill Fingerling Potatoes

2 TBL unsalted butter
1 1/4 lbs fingerling potatoes, rinsed but not peeled
1 tsp kosher salt
1/4 tsp freshly ground black pepper
1 1/2 TBL chopped fresh dill

Melt the butter in a Dutch oven or large heavy-bottomed pot. Add the whole potatoes, salt and pepper, and toss well. Cover the pot tightly and cook over low heat for 20 to 30 minutes, until the potatoes are just tender when tested with a small knife. From time to time, shake the pot without removing the lid to prevent the bottom potatoes from burning. Turn off the heat and allow the potatoes to steam for another 5 minutes. Don't overcook. Toss with the dill, and serve hot.


http://www.foodnetwork.com/recipes/ina-garten/dill-fingerling-potatoes-recipe/index.html


Now.....for one more. I dare you to try this recipe for Brussels Sprouts. This one comes from Martha's Everyday Food Magazine.

Shredded Brussels Sprouts with bacon

1. Trim 1 lb brussels sprouts (slice off bottom end and peel off hard, outer leaves); shred in a food processor fitted with a slicing blade. Set aside.
2. In a large nonstick skillet over medium heat, cook 3 slices bacon until crisp, 4-5 minutes; transfer to paper towels to drain.
3. Discard all but 1 TBL rendered fat from skillet. Add brussels sprouts and 1 cup water; season with kosher salt and freshly ground pepper. Reduce heat to medium-low. Cover; cook, stirring occasionally, until sprouts are tender, 20-25 minutes (add more water if pan becomes dry).
4. To serve, crumble bacon over sprouts, drizzle with just a bit of cider vinegar, if desired.

(I don't have a link for this one....)

Monday, March 7, 2011

Lace Cookies (other people call them Florentines)

I know I should be writing about music a bit more.....but for now I want to talk about these cookies. I have had this recipe for at least 10 years and have no idea where it came from (a recurring theme here, but it's true).

My husband has been traveling for the last week and I wanted to bake some cookies to welcome him home. My first thought was Chocolate Chip Cookies...because they are just so yummy. Then I remembered this recipe and thought, "Well now I have a great excuse to make these again"!

I posted a picture of my creation on Facebook and was so happy when my friend Kellie (see the Immersion Blender blogs....) thought I had brought them home from the store.  hee hee......!

The recipe is super simple to put together  - but trust me on this one point: You MUST use either a Silpat (with butter) or foil slathered in butter or the cookies will cement themselves to your baking sheet and you will probably end up throwing it away. Seriously. I think parchment may work too, but I haven't tried it - I can only vouch for the two previous methods.
So here's the fabulous recipe for Lace Cookies (otherwise known as Florentines)

1/2 C butter (1 stick)
1 C regular oats
3/4 C sugar
1 beaten egg
1 tsp vanilla
3 TBS flour
1/4 tsp salt
1/4 tsp baking powder

Line cookie sheets with silpats or foil and lightly butter.

In large saucepan, melt butter. Remove pan from heat and stir in oats, sugar, egg and vanilla. Then add flour, salt and baking powder. Mix well. The dough with be VERY runny and loose.

Use a measuring teaspoon to spoon mixture onto prepared baking sheet, several inches apart (the cookies will spread!), 9 to a sheet.

Bake at 350 for 9-11 minutes or until golden brown.  Let cool on sheet, on a wire rack for another 10 minutes (til cookies are set).

Peel CAREFULLY from foil or silpat.

If desired, dip edges in melted chocolate and roll in chopped almonds.

To melt chocolate, chop 1/2 bar of good quality baking chocolate and put in a glass bowl. Microwave in 30 second increments, stirring in between, until melted.


Saturday, March 5, 2011

The Immersion Blender

This is for Kellie......


Here is my Braun Immersion Hand Blender. There are many different brands on the market, but as I said in an earlier post, this one was given to me so I had no choice. And it has been a task master! I've used it countless times and it's still going strong.


Here are 2 pictures for you:


I never thought I would use this as much as I have - you'll be surprised if you get one. The ONLY caution I have is to be careful because if you don't keep it down in the pan when it's on, it WILL splatter....and hot liquid splattering all over you is not fun.

Friday, March 4, 2011

Instead of potatoes.....

I know...the title of this post will probably make you think I don't like potatoes. I love potatoes and have a few potato recipes I intend to post for you that I think you will enjoy. The potato, when eaten plain, is high in fiber and low in fat which is very good for you.  BUT.....who eats a plain potato??!! I know I don't! Give me potatoes fried, scalloped, au gratin, slathered in butter, with cheese, sour cream or gravy. Come ON!

So.....for those times that I reeeeeeeeeally want some mashed potatoes, but am feeling a bit "fluffy" (as my mom would say), I choose to make Mashed Cauliflower.  Do NOT snub your nose at this until you've tried it.  In fact, if you try this and hate it, I will make a public apology to you.

I have a great memory of my friend Suzi when we were in grade school. I would go next door to her house, wanting to play, and her mother wouldn't let her leave the dinner table until she ate all of her dinner (which included vegetables). So I would eat her food and we'd go play!  I remember asking Suzi to try something (who knows what it was - probably a vegetable). She would refuse, and I would say, "But you don't KNOW if you don't like it until you TRY it. Just TRY it and then if you hate it, I'll stop asking you to try it". She was as stubborn as I was. Even though she wouldn't budge, I still loved her. We are still very good friends ....although I think she needs to eat more vegetables.

Tonight I cooked a piece of "White Ruffy" (you can get it from Trader Joes - it's the only frozen fish I'll eat because it is always very moist!) in Martha Wrap with some tiny tomatoes, sliced mushrooms, garlic, parsley, lemon and olive oil. I served it over mashed cauliflower. YUM!

Just for grins, here are the pictures I took: the first is before the fish went into the oven. The second is the fish in Martha Wrap. The last is my dinner....you really can't see the delineation of the fish from the mash....but oooooohhh  it was yummy. Also, that's an iced tea....not Bourbon on the rocks.


This recipe happens to be another original. Go ahead. I dare you.

Mashed Cauliflower

1 head of cauliflower, cut into flowerettes
2 cloves garlic, minced,
2 tablespoons butter
1/4 C 1/2 & 1/2
1/4 C freshly grated Parmesan Cheese
Salt and Pepper to taste

Boil the cauliflower until soft then drain in a colander.

In the same pot, melt the butter and add the garlic. Cook over low heat til soft - don't burn the garlic!
Add cooked cauliflower back to the butter/garlic mixture.
Add the 1/2 & 1/2 (you can use heavy cream if you like) and the Parmesan and S&P.

Cook on low until heated through, about 2-3 minutes.

Get out your immersion blender and blend until creamy but not liquefied. Let it cook for a few more minutes to get thick.

Enjoy!


Wednesday, March 2, 2011

Marinara me....

My husband, Lee, if he could, would eat angel hair pasta with marinara every night of his life, and be happy about it. He LOVES pasta. He REALLY loves pasta when he comes home at 1 or 2 am after a gig. It's the epitome of comfort food for him. Before I was married to Lee, I didn't eat much pasta because I always try to keep my carbs at a minimum. But when your husband loves pasta....well....whatcha gonna do?!

So, for the last 5 years (of our marriage) I've been trying different recipes for marinara. None of them really satisfied him. He preferred to buy Rao's (which is the BEST jarred sauce you will EVER buy....trust me on this one. Do a google search on Rao's and you will see that NOBODY can make a reservation - the food is so good that people have tables in their names and never give them up. The closest you will ever get to Rao's is the one in Vegas. I encourage you to go there. It is an EXACT replica of the one in New York, down to the very pictures on the walls, not to mention the recipes).

Anyway.....after many attempts, one night I made a sauce that Lee lost his mind over and insisted I write down because he wanted me to make gallons of it and put it in the freezer so he could eat it at will (I have yet to do that....).

Here's Lee's Favorite Marinara~

1/4 C olive oil
2 small yellow onions
2 cloves garlic, minced
salt and pepper to taste
1/8 tsp crushed red pepper
2-3 small squeezes of anchovy paste (from a tube)
10 leaves of fresh basil, minced
1 can of Cento (no substitutes!) tomatoes, squished by hand into pan
1/8 tsp sugar
swirl of olive oil

In a large pan, over medium heat, cook the onions in olive oil until translucent and soft, about 5-8 minutes.  Add garlic and turn heat to low.  Season with salt and pepper, add red pepper, anchovy paste and basil leaves.
Cook about 10 minutes.

Add tomatoes and sugar.
Continue cooking on low for about 20 minutes. Add a swirl of olive oil to finish (If desired. Personally, I LOVE olive oil).

At this point, you can leave it a bit "chunky" or you can whip out your handy dandy immersion blender and make it smooth. It's up to you. Either way, the flavor is divine.

Serve over your favorite pasta. Enjoy!

mmmmm......the marinara!